Many devices have been made for measuring deformation (or strain). Strictly speaking, since gage lengths are always finite, we measure deformations. While we frequently calibrate our output signal to give average strain over the gage length, we are in reality sensing finite deformation over a finite gage length.
Deformation measuring devices include innumerable devices employing mechanical, optical, electrical resistance, electrical inductance, electrical capacitance and piezoelectric principles. The large variety of devices which have been developed to measure deformations (or strain) is much too extensive to even mention here. We shall consider in some detail the electrical resistance strain gage.
Electrical Resistance Strain Gages
The use of mechanical extensometers (either dial gages or LVDT type) gives us a reusable measuring device for determining deformation over fairly long gage lengths (typically 2" or 8"). Average strains are then obtained by dividing the measured deformations by the gage length. This approach is satisfactory provided the strain is essentially constant over the gage length, provided we do not require very short gage lengths, and there is adequate space to mount the extensometer on the specimen. Accurate measurement of strain in regions of high strain gradient (strain changing rapidly with position), on curved surfaces or in close quarters (i.e. inside a hole) are generally not practical, if not impossible, using mechanical measuring devices.
The primary advantages of mechanical extensometers and other mechanical strain (actually deformation) measuring devices is the ease with which they can be used, their relatively low cost and the fact that they are reusable. Additionally, some types require no special instrumentation. Their primary disadvantages lie in their relatively bulky size, long gage lengths and the fact that the variety of practical applications is extremely limited.
Electrical resistance strain gages overcome most of the disadvantages of mechanical gages. Resistance strain gages come in gage lengths from as little as a few thousandths of an inch to gages of several inches in length. Extremely short gage lengths are used for applications involving high strain gradients or where measurements are required in areas of small radius of curvature. At the other extreme, some very long special purpose gages are made to be embedded in nonhomogeneous materials such as concrete where they automatically average the strain over a more representative sample of the material.
With proper surface preparation and choice of adhesive, resistance strain gages can be used on most materials (e.g. metals, glass, wood and plastics). In most applications gage lengths of 0.25 to 0.50 inch are very satisfactory. These relatively short gage lengths would suffice in all but the most demanding applications and yet they are long enough to make installation relatively easy.
Electrical resistance strain gages are relatively inexpensive (costs vary from about $3 for a single element gage to $35 or more for more sophisticated multi-gage configurations). Special measuring instruments are required when using resistance strain gages. The instrumentation must be connected to the gages via lead wires, but it may be remote from the specimen if that is needed or desired. Also, the gages are good only for a single installation (i.e. you can't remove and reuse them on another specimen). They can be reused only to the extent that they remain undamaged and on the original specimen.
Electrical resistance strain gages have their primary advantages in that they come in such a wide range of gage configurations and lengths, are extremely accurate, have a sensitivity of about one micro-strain, and are relatively inexpensive to use. Their primary disadvantage lies in the fact that strain gage installation is somewhat of an art (but it can be mastered with a little practice).
A comprehensive coverage of electrical resistance strain gages would require an entire text. Our intent here is to simply introduce you to this vast and important area of strain measurement. Strain gages come in thousands of sizes, shapes, and configurations. Additionally one can select from a wide assortment of gage foil alloys, carrier matrix (backing), and electrical resistance. Additionally, temperature operating range and maximum strain range capability varies with gage material. Some gages are designed primarily for dynamic testing while others are normally used for static testing. Special purpose gages may compensate for temperature change or lateral sensitivity. The possibilities are almost endless, but they all operate on the same basic principles.
As an example to give you some idea of the operating range of electrical resistance strain gages, we note the following fairly typical values for a Constantan foil gage encapsulated in polyimide (Micro-Measurements):
- Universal general-purpose strain gages primarily used for general purpose static and dynamic testing.
- Normal temperature range: -100o to +350oF
- Strain range: �5% (�50,000 micro-strain) for gage lengths over 1/8 inch.
The theory of operation of the electrical resistance strain gage is based on Lord Kelvin's discovery that the electrical resistance of a wire changes when the wire is deformed. The electrical resistance R of a wire of length L and cross-sectional area A is given by:
where r is electrical resistivity of the material. If the wire is stretched the length L increases and the cross sectional area A decreases resulting in a increase in electrical resistance of the wire. The resistivity r is a function of the material and is one of those "engineering constants" that is actually a variable. The resistivity increases with strain for most materials, but it may be nearly constant or decrease with strain for other materials. It is also temperature dependent.
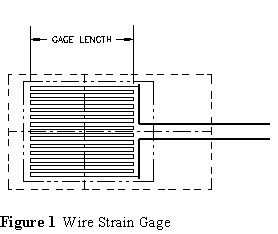
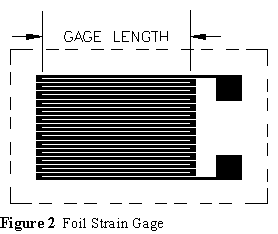
Gages were originally made of wire (about one mil in diameter) (Figure 1) but are now typically etched from thin foil (about 0.0001 inch thick)(Figure 2). The wire or foil forms a pattern of parallel elements and is bonded to a non-conducting carrier or backing. The carrier may be paper or a thin flexible plastic film. Hundreds of shapes and sizes of gages are manufactured, but the examples shown (enlarged) are fairly typical of single-element gages:
Foil gages are preferred since they can be manufactured in shorter gage lengths than wire gages and have less sensitivity to transverse strains. Foil gages also have a flatter construction which makes them less susceptible to mechanical damage and allows them to conform to curved surfaces more easily.
The gage (actually its carrier) is cemented to the specimen. As the specimen is loaded, and thus deformed, the gage is deformed along with it, the gage length is changed and its electrical resistance changes proportionally. Since the gage is securely bonded to the specimen it can contract as well as elongate with the specimen, thus we can detect both tensile and compressive strains. In order to measure these changes we need instrumentation which will allow us to accurately measure very small changes in electrical resistance. These changes in electrical resistance permit us to determine the strain (average strain over the gage length). The governing relationship is as follows:
where R is the electrical resistance of the gage (typically 120 ohms), DR is the measured change in electrical resistance and GF is the gage factor. The gage factor (GF) is a function of the gage material and is supplied by the manufacturer. A value of about 2�20% is typical.
We can not simply use an ohmmeter to measure the changes in resistance of the strain gage. In order to understand why this is so consider the following: Given a gage with a gage factor of 2 and a resistance of 120 ohms, the resistance change corresponding to �1 microstrain would be:
Obviously this resistance change is too small to measure with a conventional ohmmeter. But do we need this magnitude of sensitivity? One needs only look at the sensitivity of a typical mechanical extensometer to answer that. An 8 inch extensometer which permits deformation measurements to �0.0001 inch has a sensitivity of (�0.0001)/8 = �12.5 � 10-6. This is just 12.5 times the assumed sensitivity of an electrical resistance strain gage. Even if we are satisfied with this level of sensitivity we would require resistance change measurements of the order of �0.003 ohms!
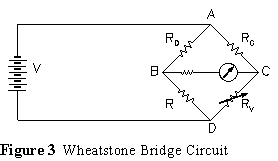
We must resort to a Wheatstone-bridge circuit (Figure 3) to measure these small resistance changes. We shall employ an instrument based on the Wheatstone bridge that is intended specifically for strain measurement. Our instrument is called a "strain indicator". In its simplest form (quarter bridge) our strain gage with resistance RG forms one arm of the Wheatstone-bridge circuit as shown in Figure 3.
The resistances RD and R are precision resistors supplied internally by the strain indicator. Resistance RV is a precision variable resistor used to balance the bridge. The bridge is initially balanced so that the resistances satisfy the relationship:
RD/R = RG/RV
or
RG * R = RD * RV
As the gage resistance changes we can do one of two things depending on the particular strain indicator: a) we can balance the bridge again and record the required change in the precision variable resistor RV, or b) we can measure the voltage imbalance across BC. In either case we detect a quantity that is directly proportional to the strain of the gage being measured. Strain indicators are designed so that we can calibrate the output to read directly in strain (rather than resistance change or voltage change).
Electrical resistance strain gages are very sensitive to temperature changes. When it is desirable to compensate for temperature change (i.e. where we want to measure deformations due to loading but not those due to temperature changes) we can replace the internal resistance RD with an external "dummy gage". The dummy gage (temperature compensating gage) should be the same type as the active gage, mounted on the same type material and subjected to the same environmental conditions. The dummy gage should not be subjected to any loading. Any temperature effects felt by the active gage should be compensated for in the bridge circuit by a comparable change in the dummy (temperature compensating) gage.
The other three resistances R, RD and RV of the bridge do not necessarily have to be the precision fixed and variable resistor provided by the strain indicator. Additional sensitivity and capabilities can be gained by replacing one (half bridge) or all three (full bridge) of these resistors by properly selected and placed strain gages. The output of the strain indicator is actually the algebraic total,
, of the four legs of the bridge.
The half bridge configuration using RG and RD can be used to measure a pure shear strain directly. In the case of pure shear the Mohr's circle is centered at the origin with a diameter equal to the pure shear strain. If the strain gages RG and RD are orientated perpendicular to each other and at 45o to the pure shear directions they will be measuring the principal strains and their combined output will equal the diameter of Mohr's circle,
.
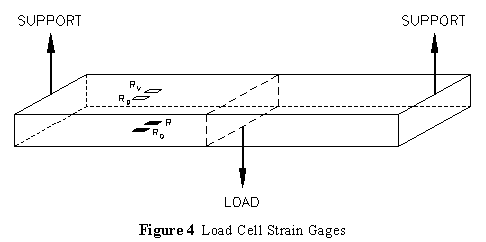
The full bridge configuration is often used in such devices as load, torque and pressure transducers. In these applications active strain gages are used for all four legs of the bridge. In the case of a load transducer a beam configuration can be set up with the support supplied by one side of the transducer and the load by the other. The strains on the top and bottom surfaces of the beam are all proportional to the applied load so that if gages RG and R are attached to the bottom of the beam (in tension) (Figure 4) and the other two gages are attached to the top surface (in compression) then the effects are additive and the transducer can be as much as four times as sensitive as one using a single active strain gage.
Strain gage extensometers typically utilize the full bridge configuration, but some employ the half bridge. Strain gage extensometers are available in both uniaxial and biaxial configurations. The uniaxial models sense only the axial strain in a tensile test while the biaxial models also sense the lateral (transverse) strain. Biaxial extensometers can be utilized for determination of both the modulus of elasticity and Poisson's ratio.
Engineering Mechanics of Deformable Bodies, by Byars, et.al., 4th Ed. Harper & Row, 1983, Chapter 15, pp 471-484.
Handbook of Experimental Stress Analysis, by Hetenyi, John Wiley, 1950, pp 160-189.
Mechanics of Materials, by Higdon et.al., 4th Ed. Wiley, 1985, pp 81-83.
Micro-Measurements Catalog, 1988.


