Who
This is a larger, combined group assignment. Teams will work together as follows for Projects 3, 4 and 5.
Combined Group Small Groups Combined Group Small Groups A 01 + 19 J 10 + 28 B 02 + 20 K 11 + 29 C 03 + 21 L 12 + 30 D 04 + 22 M 13 + 31 E 05 + 23 N 14 + 32 F 06 + 24 O 15 + 33 G 07 + 25 P 16 + 34 H 08 + 26 Q 17 + 35 I 09 + 27 R 18 + 36
When
As a combined group, complete the following nine steps by your section's lab period during the week of October 3-7. You should be ready to discuss and/or show your results during that lab period.
What
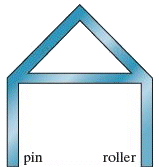
Step 1. Select Location and Building
Pick one of the two buildings modeled by the small groups in Project 2 for the combined group to analyze in Projects 3 and 4.
Pick a location for the building, and determine the following information for this location. If the group wishes, it can be one of the locations used by the smaller groups in Project 1.
- ground snow load
- wind speed
Label each of the following structural elements on either the drawings or physical model developed in Project 2.
- rafters (or trusses): use R1, R2, R3...
- studs: use S1, S2, S3...
- floor joists: use J1, J2, J3...
- skids: use SK1, SK2, SK3...
Include this information and all of the following in the combined group's wiki.
Step 2. Dead Loads and Tributary Areas
Approximate the dead load of the roof covering in psf based on the results from Project 1, Step 2. Look at the wikis for the groups that measured weights. If you cannot figure out how the roof is assembled, then assume asphalt shingles, No. 30 roofing felt, and 0.5" OSB.
Approximate the dead load of the siding in psf. The thickness can probably be measured at the corner of the building.
Approximate the dead load of the floor covering in psf. This is probably just plywood, and the thickness can probably be measured at the edge of the doorway.
Determine the tributary area for each rafter (or truss), stud, and floor joist. Use the labels from Step 1.
Approximate the weight of each piece of lumber based on it's length. Use the labels from Step 1.
Step 3. Free Body Diagrams for Dead Loads
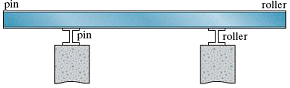
Rafters (or trusses), studs (in load bearing walls), and floor joists are typically aligned to form stack framing. Model each set of rafters and studs as a frame (see example frame), and draw a free-body diagram (FBD) of each frame. Include the dead loads from Step 2 (roof covering, siding, and lumber). Model the connection between one stud and the floor joist as a pin, and model the other as a roller. The lumber weights can be modeled as concentrated loads at the lumber centroids.
Some frames may have identical loadings. Only one FBD is needed for these frames. Just point out where these frames are located in the building.
If the door intersects one or more of the frames, then draw a FBD of the header above the door. Assume the header is connected to the studs on either side of the door with a pin and roller. Estimate the weight of the door and include that on one of the studs. If the door does not intersect a frame, then skip this.
example frame example floor joist example skid Estimate the weight of the ends walls, which are spanned by the frames. Assume these walls do not support the roof loads. Include the weight of the end wall components on the joists located below these walls.
Model each floor joist as a beam, and draw a FBD of each joist. Include the loads from the frame (at the frame pin and roller connections), floor covering, joist weight, and end-wall weight (if applicable). If there are more than two skids, assume only the two outer most skids carry loads.
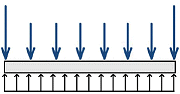
Model each skid as a beam sitting on the ground, with the ground creating a uniform distributed load, and draw a FBD of each skid. Model one floor joist as being connected to the skid by a pin and the others by rollers.
Step 4. Live Loads
Approximate the design wind pressure pwind as described in Chapter 1 of the textbook. Use the values for I, Kzt, Kd, G, etc that the group feels are appropriate.
Approximate the design snow pressure psnow acting on the roof as described in Chapter 1 of the textbook. Use the values for I, Ce, Ct, etc that the group feels are appropriate.http://civil.eng.buffalo.edu/CIE429/ASCE-7-02-%20-Load%20Combinations-S02.pdf
Use ASCE-7 section 4 to determine the following live loads. Use what you think is the most appropriate occupancy or use for the storage building.
Section Live Load 4.2 Uniformly Distributed Loads Lo 4.3 Concentrated Loads 2000 lb or 200 lb ? 4.9 Minimum Roof Live Loads Lr
Step 5. Free Body Diagrams for Uniform Live Loads
Repeat Step 3 using only Lo and Lr. Ignore all of the dead loads.
Step 6. Influence Lines
If Lo were replaced by the concentrated load from Step 4, where would the concentrated load be placed in order to have the most influence? Influence lines may help determine this.
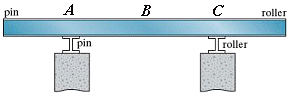
Draw influence lines for the bending moments at points A, B and C, corresponding to points in a floor joist directly above the skids and at mid-span of the joist.
Step 7. Free Body Diagrams for Concentrated Live Loads
Modify Step 5 by placing the concentrated load at the position determined in Step 6. This will probably only require one new joist FBD to be drawn.
Determine whether this joist has a larger bending moment due to the uniform live load or the concentrated live load. If you are not sure, then draw shear-force and bending-moment diagrams to verify.
Step 8. Free Body Diagrams for Combined Dead and Live Loads
Using the more severe load case from Step 7, repeat Step 3 for the combination of dead and live loads.
Step 9. Maximum Stresses
Determine the following stresses caused by the loads in Step 8. You do not have to provide these stresses for each stud/joist -- just the largest values for the entire building.
- maximum compressive axial stress in the studs
- maximum compressive bending stress in the floor joists
- maximum tensile bending stress in the floor joists
- maximum horizontal shear stress in the floor joists
How do these stresses compare to the air-dry values in the following table? Modulus of rupture corresponds to bending stress. Crushing strength parallel to grain corresponds to axial stress in the studs.
pitch = 0
overhang = 0
how to model connections?
specifiy room purpose, IRC Table R301.5
model snow and wind separately
interior frame with stacked framing (ignore end frames)
2x4 studs
shed roof
skids
wall height
16" oc
say it's okay to make some assumptions (certain joints are pin connected instead of fixed) [in order to make it solvable (determinate)] as long as they are documented
perhaps point out that indeterminate frames will be covered later
1 fixed joint
pitch = 0
snow load .ne. 0
wind load =0
overhang = 0
3 fbds, 9 unknowns, 9 equations1 fixed joint
pitch > 0
snow load .ne. 0
wind load = 0
overhang = 0do another with overhang ~ 1' both sides
show fbd of header over door and window -- assume pin and roller
show frame on either side of door (or just which one has larger load)
show frame on either side of window
door and window need to be in load-bearing wall to make this interesting
skid fbd
max normal stress, max shear stress (how does this compare to material limits?)
max deflection (how does this compare to L/360, etc?)
collect data in one place
length width max stud normal stress max rafter normal stress max rafter deflection max joist normal stress
- location
- pitch
- overhang
- 2x4 studs, 2x6 studs
- snow load
- wind category
- cost
collect data from all groups
snow
- less than 5-deg?
- open flat terrain vs large city
- heated vs unheated
- agriculture/storage vs hospital
Step 3.
give wind exposure description
- rigid
- pitch
- fully enclosed
- 3-sec gust (map in book)
- agriculture/storage vs hospital
- open flat terrain
- hills
- wind acting alone
- foam model showing pressures - crayons
Step 4.
- free body diagrams
- rafter/truss
- compressive load on each stud
- wind load on studs
- pressure diagram on model
- floor joist
- maximum stress
- rafter/truss
- stud
- floor joist
- check against wood stress limits
- maximum deflection
- floor joist
Step 5.
- biggest hole that can be drilled in ___ p. 105, 132
- fastener schedule question
- cost estimate (wood only)
- materials list (wood only)
- design
- panel thickness, joist/rafter spacing and size
- fasteners Table 602.3(1)
- page numbers for certain things (or section #)